Annealing is a process by which steel or iron can be made soft, expecially after the metal has been subjected to hammering or some other process that hardens it. The book Model Mechanical Engineering says "The work is heated slowly to a bright cherry red (950 degrees C) and immediately smothered in hot sand or ashes. Recrystallization of the steel takes place during the annealing process; the cooling rate being made as slow as possible to bring the metal to a softened state. Internal stresses in the material are removed by annealing; it is for this reason that chains which have become work-hardened in service are periodically annealed."
As I attempted to make a helmet, it became obvious that you need to have enough metal to keep the helmet about the same thickness everywhere or ideally thicker where the most protection is needed. The simplest method to do this is to just not hammer in the spots you want to keep thick. Of course, this is impossible, but it does have a lot to do with the method I found that seems to work. As I was making my bed one morning and thinking about this "not hammering on thick spots" and "pushing metal around," I pulled the sheet taut. THUNK!! (sound of hand hitting head!) Consider when you put a sheet on a bed; you have wrinkles on one side, so you pull the other side to straighten the wrinkle out. You can do the same thing with a sheet of steel and use it to shape your helmet.
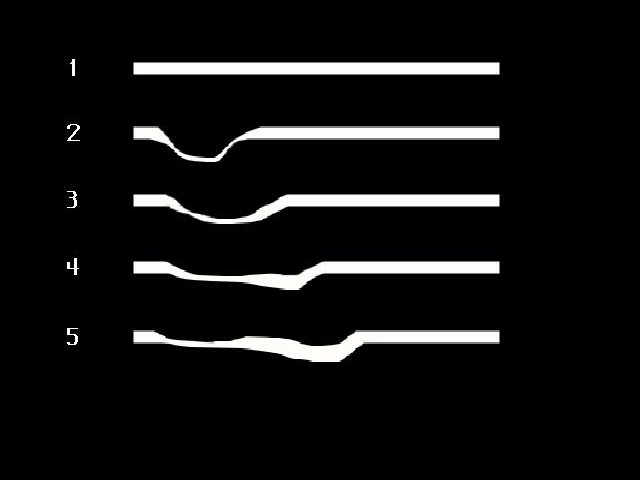
The idea is fairly simple. First you create a depression by hammering directly on the steel on the anvil. By directly, I mean the steel is laying on the anvil and you strike the steel, thereby spreading it out and creating a depression or wrinkle. The next step is the pulling part. You lift the metal up off of the anvil surface about 1/4 inch in the direction you want to move the metal. Then hammer the metal on the edge of the depression in the direction in which you want to move the metal until it just hits the anvil. Again, lift the metal up and repeat until you are at the position where you want the metal. The net effect this has is to spread the extra metal to another spot on the helmet. Why it works is because when you lift the steel off the anvil and hammer on it, it doesn't compress the metal, it just draws the slack from the depression so the new depression is about the same thickness as it was before you hammered it.
You can also do this technique in reverse by lifting the piece off the anvil and hammer were you want the metal. Then work your way to the spot were you have extra metal and spread it. This last technique is what I use to make my helmets, as I will explain later. I hope I have explained the technique well enough, it is very difficult to explain so I made an illustration that will hopefully fill in the parts I haven't explained well enough.

I soon realized that pulling the metal is only useful if you are working on the inside of the helmet. Working on the outside, the pulling technique doesn't work well at all, but could be used for repousse', or ribbing. As I started to construct armor, I talked to a few people who work in similar fields. One of the professions today that is similar to medieval armouring is the auto-body mechanic, who uses many of the same tools that I have seen in old illustrations of armour makers and their workshops. The mechanics always talked about pushing the metal here and there. I didn't quite understand what they meant about pushing the metal, but it did give me a good starting point. Later, I realized that they work the metal from the outside, holding their anvils on the inside of the car part they are working on and hammering on the outside.
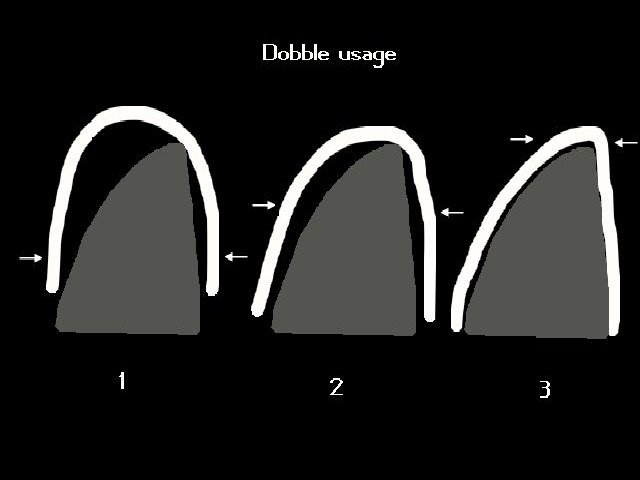
 Hammering on the outside of the helmet is very much like pushing the
metal and a good example is the construction of a pig-faced bascinet. This
helmet has a sharp point at the top and to the back. This point can be made by
hammering enough metal to the top-back of the helmet using the pull method. The
helmet is then put on a stake or a dobble and hammered on the outside, slowly
pushing the point up by using the extra metal. The stake or dobble keeps the
shape of the helmet and allows you to push the metal around until it is in the
correct shape, similar to the use of the hand-held anvils auto-body mechanics
use. You can use the same method to shape the crest of a helmet using a crest
stake; all you need to do is pull up enough metal for the crest and then hammer
it down onto the stake.
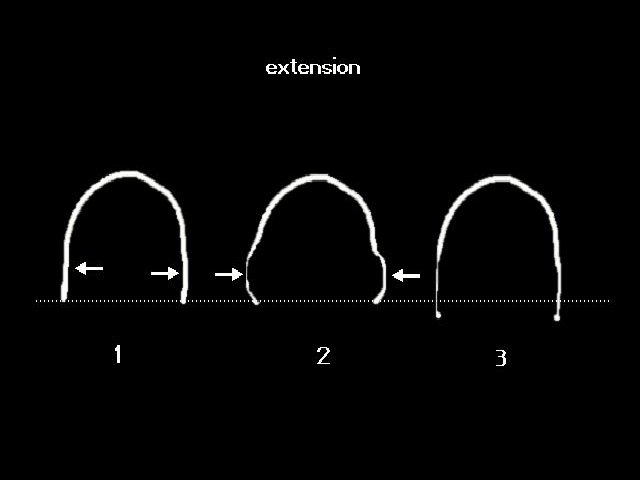
 You can combine both of the previous techniques in the construction of a
helmet or any other piece of armour. One example is to use the inside technique
to create a bulge around the helmet and place it were you want it. Then use the
outside technique with a dobble or stake to flatten the bulge. The net effect
is to extend the length of the helmet in the direction perpendicular to the
direction of the bulge. One thing you need to keep in mind is that the dobble
or stake needs to be as wide or have as much surface area as the width or
surface area of the flattened bulge.
After you have your helmet or other piece of armour in a finished state that is reasonably how you want it, it is time to polish the exterior surface. The following method is what I like to use. It is by no means the only way to do this.
To keep the surface of the piece as free of little warps and waves as possible, I like to file the entire outside surface to bring out the high points. When you file, use long even strokes and move the file along the surface. Don't concentrate on one spot or keep the file flat. This gives a good idea as to how true your surface is and finds the low spots that need more hammering. To hammer the low spots I like to use a small slightly rounded flat hammer. I keep this up until I have the surface I want and can then start to sand the metal with sandpaper. A sanding block is handy for pieces with large surface areas. I think the armourers of old did this, as all of the armour I have seen that was supposedly "left rough from the hammer" is too smooth to be left that way. I have several photos of Henery VIII's armour for foot combat that was "left rough from the hammer" and clearly shows file marks, so it was not just hammered. I also have a photo of a "black" sallet that was painted and again "left rough from the hammer", but, it too is much too smooth to be just hammered.
This also brings out the point that most armourers sent their armour out to be polished by people who did nothing but polish plate. If the armourers just hammered out the plate into the needed shape and then sent it out to the polishers, it makes it sound like the armourers and the polishers had a very close relationship with each other. This doesn't sound very practical, as not only would the polisher need to know when there was a problem with the surface, he would also need to send the piece back to the armourer or fix it himself. It would have been much better to just finish the surface as I described above, harden and temper the piece, and send it to the polishers. In a hardened state, it would be more difficult to ruin a piece by over-polishing and all the polisher had to do is just get the file marks out. I have pictures of paintings that were done in the early 17th century that illustrate polishers polishing plates with large polishing wheels that were powered by a water wheel and rotated in tanks of water or oil so that the armour didn't get too hot and remove the hardness and temper of the metal.
a) Anvil - You need at least one anvil that is 2 inches or more wide. A chunk of train track works well, is very cheap and fairly easy to acquire, but if you can find something wider, it would be better. The anvil needs to have a hardened surface that is smooth; if the anvil is not hardened, it will start to collapse and pieces of it may flake off leaving the anvil unusable. One way to tell if an anvil is hardened is to lightly hit the top of the anvil with a hammer. If the hammer bounces back, then it's likely that the anvil is hardened, if the hammer does not bounce back and/or leaves a mark on the surface of the anvil, then it is most likely not.
b) Forge - You need some way of heating the metal so that you can anneal, harden, and temper correctly. I have used both a forge and an oxy/acetylene welding set to anneal and harden steel. Of the two I definitely recommend the forge, but if a forge is just not practicable, then a welding set is a good alternative.
c) Stakes - It is almost a necessity to have some kind of mushroom stakes and crest stakes for the construction of deep bowls and other hard to reach areas. Stakes are metal posts that either bolt to a table or fit into the hardie hole in an anvil. They are about 8- inches tall and have heads that are shaped for a specific job. Mushroom stakes have heads that are slightly rounded and are about 1 inch to 4 inches in diameter. Crest stakes have heads that are shaped like the crest of a helmet and are used as a form to shape the helmet crest.
d) Dobbles - Dobbles are a kind of stake, except that they are shaped like a finished helmet. They were used to help the armourer make and keep the final shape of the helmet. All of the dobbles that have survived to today are made of cast iron, but I think that you could make them out of wood as well. Think of the dobble as only a guide and not as a stake or an anvil that you can hammer on. If you need to do alot of heavy hammering, use a stake or an anvil instead. Charles Ffoulkes in The Armourer And His Craft says the following about dobbles; "The (dobbles) were probably heavy iron models on which the various pieces were shaped. Two specimens in the Tower (a morion, and a breastplate) are considered by the present curator to be dobbles, for they are cast and not wrought, are far too heavy for actual use, and have no holes for rivits or for attaching the lining."
e) Hammers - You need a variety of hammers, mostly ball-peins and flat hammers. Some people like to use sledge hammers to shape their armour because it's faster, but I don't know how good that is for the metal. I personally don't have any hammers that are heavier than 28 onces and I have heard some people say that that is too heavy as well. You should have a set of hammers with long heads that can reach into deep bowls and tight spots. The heads need to have a reach of about 3 inches to up to 6 inches.
f) Files - Get as many files as you can, in different shapes, sizes, and teeth sizes you can, as you can always find a use for them. You should have at least a set of small, medium, and large files. To finish large plates, I use a large flat file that is about 14 inches long and about 2 inches wide. For tight corners, a set of round files is a must. For ornamental piercings, I use a set of jewelers files.
g) Miscellaneous - This includes metal cutting tools like chisels, drills, snips, shears, etc. or anything else you can use that will help in the construction of armour. I am always on the lookout for tools in flea markets and garage sales.
Go On To Section 2