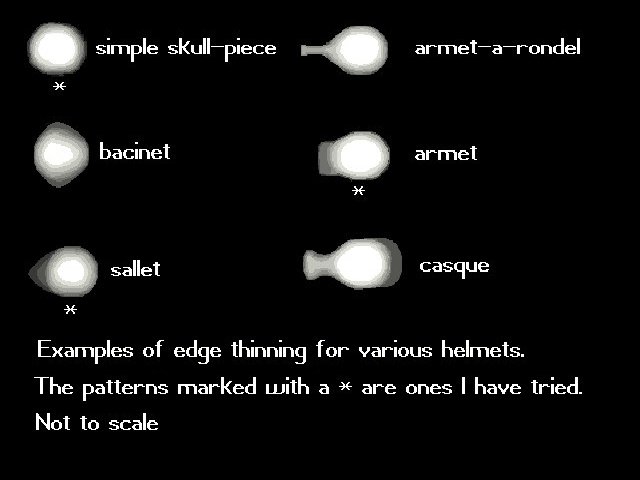
I have found that making armour without a pattern more likely than not results in problems. A good pattern can save a lot of time and headaches; it is much more difficult to cut off parts here and there once the helmet is completed. You don't want to take off too much and ruin the helmet or take off too little and have to go through it all over again. Here is an illustration of patterns I have made for some of the more common helmets made between 1350 to 1600. Keep in mind that I have only tried a few of these and the ones I haven't might be incorrect. I have put stars by the ones I have tried.

One of the feats of medieval armourers that I often see touted in books is how they were able to keep the thickness of the metal the same everywhere on the helmet. Or, even better, make the metal thick where it needs protection and thin were it doesn't, to keep the weight down. I thought a long time on this and came to a simple conclusion: the farther you have to move the metal, the more metal you need. Generally, the helmet blank needs to be thick in the center and thin twords the edges where you will hammer the least. At first, I thought that to get the extra metal in the center, you could weld a plate to the center of the pattern and when finished with the helmet, you could just grind or file off the excess metal on the edges. I have since found that it was just too much work, and believe medieval armourers were craftsmen who would have done anything to make their work easier. Besides, medieval armourers bought all of their metal already made in plates like we do today. Most armourers today, and those in medieval times, don't have the time or means to make their own plates; it just doesn't make very good economic or business sense.
So, how did medieval armourers put extra metal where they wanted and remove metal where they didn't? I think it was done by finding a plate that is the same thickness as the thickest part needed for the pattern and then in the places where the metal didn't need to be as thick, was hammered thin. Ergo, the center of the pattern was left alone and the edges were hammered down until they were as thin as needed. I have made an illustration that shows the thick and thin parts for the same helmet patterns as before. In the illustration, the lighter the shade of gray the thicker the metal.

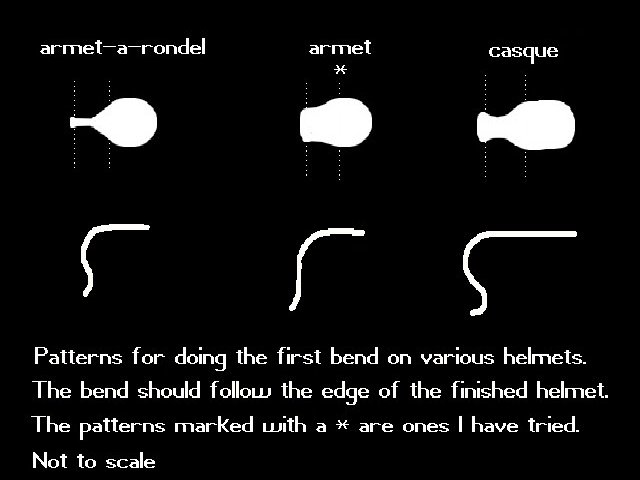
Several helmet patterns need to be bent before you start to pound on them. The purpose of the bend is to maximize the useful area of the metal. What this means is that if you bend the helmet blank, you are moving the metal closer to were it needs to be and you will not need to move the metal as much as you would otherwise. Here is another illustration that shows where you need to bend each pattern, both a top view before bending and a side view after the bend. The area between the dashed lines is where the bend needs to occur.

The next step is to do some warp prevention, because as you hammer on the helmet, it has a tendency to twist or curl up. It is very hard to correct this problem once it has gotten too far. The best thing to do is to try and prevent this from happening at the onset. This is only a problem at the very first stages of the forming process, at least as far as I have found. What you do is to hammer very close to the edge of the helmet all the way around until all of the edges have been turned up. Try not to hammer on the edge as it is already as thin as it needs to be from the edge thinning step before.
I recommend that after you have compleated this step that you should anneal the helmet before you start the next step.
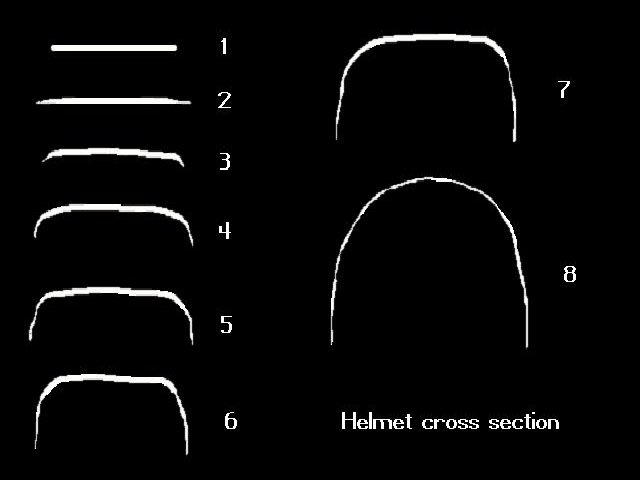
When I am hammering, I like to hammer on opposite sides, first one side and then the other as I work my way around the helmet. This will help keep the helmet from curling up and warping and helps to spread internal stresses around evenly. Try to keep the edges straight, because if they bend too much, a crack in the metal may develop. Once a crack develops, it is very hard to fix and can ruin a helmet. As you are hammering, keep in mind the areas that need more metal, like the front, top, and left side of the helmet. I have found that there is usually some extra metal on the sides that you can either pull to the front or to the top. Only work the metal between about halfway from the center of the helmet to the edge at first. I hammer using the reverse inside technique until I have the helmet about half as deep as I need it. Once you have the sides almost vertical, start moving the rest of the unhammered metal until it matches the rest of the helmet and is as deep as you need. You can do this with a stake and hammer on the outside of the helmet, or if you have a long-necked hammer, on the inside. Remember that as you are hammering the metal is becoming work-hardened and may crack if pushed too far. You should anneal the metal if it becomes harder to work than normal. This is something you need to learn to feel, myself, I still can't tell when the metal needs to be annealed. So, I usually like to anneal after major modifications, like after the edge thinning or after the helmet is hammered out but before I finish the surface.
Some helmets need both inside and outside work done on them before they are finished. This depends on the helmet and where the metal needs to be pushed. Just remember to work slow and think things out, you can always speed things up later when you become more experienced. I have found that 14 gauge is thick enough for a simple bowl; for anything else, the plate needs to be thicker. I am going to try to make a bascinet out of 1/8-inch plate to see if that is enough metal to do the job.

If your helmet needs to have a crest or comes to a point, you need to use a crest stake or a dobble. The first thing you need is enough metal to hammer the helmet out as far as about half as tall as the finished crest. Then use a crest stake and hammer the metal down around the stake until the crest is the correct shape. Start from the top of the stake and work your way down until finished.
A dobble is for very large modificaions and is used not only to do these modifications, but also to keep the helmet from warping out of shape. You could use a stake to make the point on a bascinet, but it would be more difficult to keep the helmet in the correct shape. A dobble is easily used and can be made out of iron, steel, or wood. When using the dobble, start from the bottom and work your way up, holding the helmet down as you go.
Start finishing the surface of your helmet by hammering out the small bumps and dips. I like to use a small, round, flat hammer on the easy to reach spots and a mushroom stake on the hard to reach areas. The crest should already be smoothed by the crest stake; the point on a bascinet needs to be smoothed by a specially made stake or an iron/steel dobble. Next, file the surface using long strokes and follow the surface as best you can. In this process, problem areas will show up and might need to be re-hammered. Once you have the surface completely filed, you can sandpaper it to remove the file marks. I usually start with 120-grit sandpaper and then move to 320-grit; this gets most of the file marks out.
Now it's time to harden the helmet by one of two methods. One, if you are constructing your armour out of high-carbon steel then you can harden the metal by heating it to a cherry red color and quenching it in water. Make sure to continuously move the helmet in the water as you are quenching it because steam bubbles that collect on the surface of the metal can retard the quenching process. Next, re-polish the surface with some sandpaper so you can see the color changes as you temper the helmet. When you temper the helmet, heat it from the inside, as this will make the metal softer on the inside and leave a harder exterior like the original helmets. The second method for hardening steel is called case hardening, and is very useful if you are using mild steel to construct your helmet. Practical Blacksmithing says the following about case hardening: "Case hardening consists in the conversion of the surface of wrought iron into steel. The depth to which this conversion takes place ranges from about one sixty-fourth to one thirty-second of an inch. The simplest method of case hardening is to heat the work to a red heat and apply powdered prussiate of potash to the surface. In this process the secret of success lies in crushing the potash to fine powder, rubbing it well upon the work, so that it fuses and runs freely over the work, then the latter must be quenched in cold water. It is essential that the potash should fuse and run freely, and to assist this a spoon-shaped piece of iron is often used, the concave side to convey the prussiate of potash and the convex side to rub it upon the work. If by the time the potash fuses the work has reduced to too low a heat to harden, it should be placed again in the fire, the blast being turned off, and worked over and over till a light blood-red heat is secured, and then be quenched in quite cold water. Work case hardened by this process has a very hard surface indeed, and appears of a frosted white color, resisting the most severe file test." Again temper the piece to a blue color. To have better control of the tempering process, heat a bar to yellow heat and use it to heat the helmet. Or, you can use a torch to do the same, just be careful to remember some torches don't work well in a enclosed space where there might not be enough oxygen. As you heat the helmet, look on the outside and watch the metal change color. When it turns a blue color move to another area, and when the entire helmet is blue quench in water again to set the temper. I haven't tried to harden and temper any of my armour because my welder can't heat a helmet sized piece of metal hot enough to do it. After tempering you can either leave the helmet blue or polish it again with 400-grit to 600-grit sandpaper, or use emery paper. You can also treat the metal with gunblueing or stove black, etchings, etc.
Go Back To Section 1